Google Analytics is the most used product for tracking traffic and user interaction on your site. But Google Analytics is blind to WordPress buttons and other elements on your site. Google Analytics created Event Tracking code to track To enable to track interaction with elements. MaxButtons Pro lets you implement this Event Tracking for WordPress Button Clicks easily without coding, testing and debugging.
Buttons on your site are the most important elements in terms of tracking conversions. Additionally by using Event Tracking on your buttons you can then use them as Goals in Google Analytics. Of all of the interactions you can have with buttons, tracking when a user clicks on your button is the most important interaction to track.
Here is how you get Event Tracking for Button Clicks set up in MaxButtons Pro
To get started you first need to have either Google Analytics Classic or Universal set up on your site. This can be done by manually inserting your Google Analytics tracking code into your site or using any of the WordPress Plugins such as Google Analytics or Google Analytics Dashboard for WP or others which allow you to include your tracking code on your site.
Select a button you would like to would like to track in Google Analytics and Scroll down to the Google Analytics Event Tracking for Button Clicks. Select the box Enable Event Tracking.
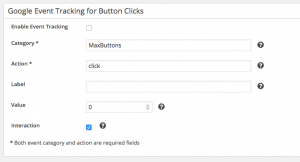
There are 5 items you can specify for your buttons: Category, Action, Label, Value and Interaction. Category and Action are required.
Category is a group name for a set of buttons you want to track. For example you might want to track all of your conversion call to action Buy Now buttons as a group. And then put your email subscription buttons in another group. You can also group product buttons.
Action for buttons is Click. That what users almost mostly do on buttons.
Label is an optional to add an additional dimension. This is a good place to put the page that the button is shown on such as Home Page, Shopping Cart, Product Page, etc.
Interaction – when checked the event hit will not be used in bounce-rate calculation by Google Analytics. We recommend clicking this setting.
Test your work
Now that you’ve set up your button, save your settings. Open up Google Analytics and then go to Real Time > Events. Open your site in a separate tab an navigate to the button you just configured. Click the button and go back to Google Analytics. You should see the event appear in real time including the Event Category and Action.
Now you’ve set up your first button. Go through the rest of your buttons and configure the ones that are important to you. Event Tracking for WordPress Buttons is Ready, Set, Done with MaxButtons Pro.